Getting crispy skin right on salmon isn’t just about the technique—it’s about understanding that initial sear temperature. Many rush into the pan, chasing crispiness without thinking about the heat level, and end up with soggy skin or overcooked flesh. I’ve learned that patience and a steady hand make all the difference, especially when aiming for that perfect, crackly exterior. It’s a small detail that transforms the dish from good to memorable.
This recipe is my go-to after countless attempts, where I finally cracked the code. I love how a simple switch in heat control can turn a humble fillet into something with that irresistible, almost smoky crunch. It’s honest work, but once you get the hang of that initial sizzle, you’ll find it hard to go back to any other method. The key is respecting the heat, letting the skin do its thing.
Focusing on the overlooked importance of the initial pan sear temperature to achieve perfectly crispy skin without overcooking the delicate flesh.
The overlooked heat step
- Crispy skin salmon reminds me of lazy weekend mornings, where the smell of seared fish fills the whole house with a comforting warmth.
- I still get a little nervous flipping that fillet—hope the skin stays intact, but when it crisps up just right, it’s pure satisfaction.
- There’s a nostalgic thrill in hearing that satisfying crackle as I serve it—like a quiet victory after all the practice.
- I love how this dish makes me pause, savoring each tender bite that’s perfectly balanced by that smoky, crunchy skin.
- Every time I nail the crispness, I feel a small, proud spark—like I’ve cracked a secret only a few lucky cooks know.
The spark behind this dish
Crispy skin salmon has always been a special dish for me, not just because of how it tastes but because of the moments it creates. I remember one evening, trying to perfect that crackly skin, and it suddenly clicked—patience and heat control. That crispy exterior, paired with tender, flaky flesh, feels like a quiet victory each time. It’s a simple dish, but mastering that initial sear makes it feel like I’ve unlocked a little secret in the kitchen.
Crispy Skin Salmon Trivia
- Crispy skin salmon gained popularity in Japanese cuisine, where the contrast of textures is highly valued in sashimi preparations.
- The technique of crisping fish skin dates back to ancient techniques in Nordic and Mediterranean cooking, emphasizing preservation and flavor enhancement.
- In historical fishing cultures, achieving a crispy skin was often a sign of freshness and skill, used as a mark of a good catch.
- Salmon’s skin contains omega-3s and collagen, making it not only flavorful but also a nutritious addition when crispy and rendered properly.
Ingredient breakdown
- Salmon fillet: I look for bright, firm flesh with a shiny skin—freshness is key for that crisp finish; skip the dull or soft skin.
- Salt: I prefer coarse sea salt, which draws out moisture and helps crisp the skin; use less if your salmon is very salty already.
- Oil: I favor a high-smoke-point oil like grapeseed or clarified butter—nothing too fragrant, just a neutral shimmer that crackles when hot.
- Lemon: Bright, zesty lemon juice adds a fresh contrast; skip if you want a more neutral, pure fish flavor.
- Pepper: I like freshly cracked black pepper, which gives a subtle spicy crunch; pre-ground can lose its bite during cooking.
- Herbs (optional): A sprig of thyme or dill can add a whisper of aroma—add after searing for freshness, not during the high heat.
- Pan: A heavy, non-stick or cast-iron skillet ensures even heat and helps achieve that perfect crackle without sticking.
Spotlight on key ingredients
Salmon:
- Salmon fillet: I look for bright, firm flesh with a shiny skin—freshness is key for that crisp finish; skip the dull or soft skin.
- Salt: I prefer coarse sea salt, which draws out moisture and helps crisp the skin; use less if your salmon is very salty already.
- Oil: I favor a high-smoke-point oil like grapeseed or clarified butter—nothing too fragrant, just a neutral shimmer that crackles when hot.
Salt, Oil, Lemon:
- Salt: Coarse sea salt is my go-to—its larger grains help draw moisture efficiently, making that skin crackle with a smoky crunch.
- Oil: A neutral, high-smoke-point oil like grapeseed or canola—essential for a crackly skin without imparting extra flavor or burning.
- Lemon: Bright, zesty lemon juice adds a fresh zing—distributes a citrus aroma that elevates the crispy bite, especially after searing.
Notes for ingredient swaps
- Dairy-Free: Use avocado oil instead of butter for a neutral, smoky flavor without dairy.
- Low-Sodium: Opt for unsalted salmon or rinse salted fillets to control saltiness and keep the skin crisp.
- Vegan Alternative: Try eggplant slices or tofu skin, but the crispness and flavor will differ significantly.
- Herb Variations: Substitute dill or tarragon for thyme—each adds a unique aromatic note that pairs well with salmon.
- Citrus Swap: Lime or orange juice can replace lemon for a different bright, tangy punch.
- Oil Choice: Use sesame oil for a nutty aroma, but keep in mind it has a lower smoke point—add after searing.
- Salt Type: Coarse sea salt or kosher salt helps draw out moisture better than fine salt for a crisp skin.
Equipment & Tools
- Heavy skillet (cast iron or non-stick): Ensures even heat for crispy skin
- Fish spatula: Helps flip and lift delicate fish without breaking skin
- Paper towels: Dry the skin thoroughly for crispiness
- Small bowl of oil: High-smoke-point oil for searing
Step-by-step guide to pan searing
- Gather your tools: a heavy skillet (preferably cast iron), fish spatula, paper towels, and a small bowl for oil. Preheat the skillet over medium-high heat for about 2 minutes until hot but not smoking.
- Pat the salmon skin dry with paper towels—this step is crucial for crispiness. Lightly season the flesh side with salt and pepper, avoiding the skin.
- Add a thin layer of high-smoke-point oil (like grapeseed) to the hot skillet. It should shimmer but not smoke excessively.
- Place the salmon skin-side down in the skillet. Press gently with a spatula for about 10 seconds to prevent curling. Cook without moving for 4-5 minutes, until the skin is deep golden brown and releases easily from the pan.
- Flip the fillet carefully using a fish spatula. Cook flesh-side down for 1-2 minutes, just enough to finish through without overcooking. The skin should be crackly and the flesh opaque.
- Check the doneness: the flesh should be firm but still moist. The skin should be crisp and dark golden. If the fish feels too soft or skin isn’t crispy, adjust your heat slightly and cook a little longer.
- Remove the salmon from heat. Let it rest for 2 minutes—this lets the juices settle and prevents flaking when serving.
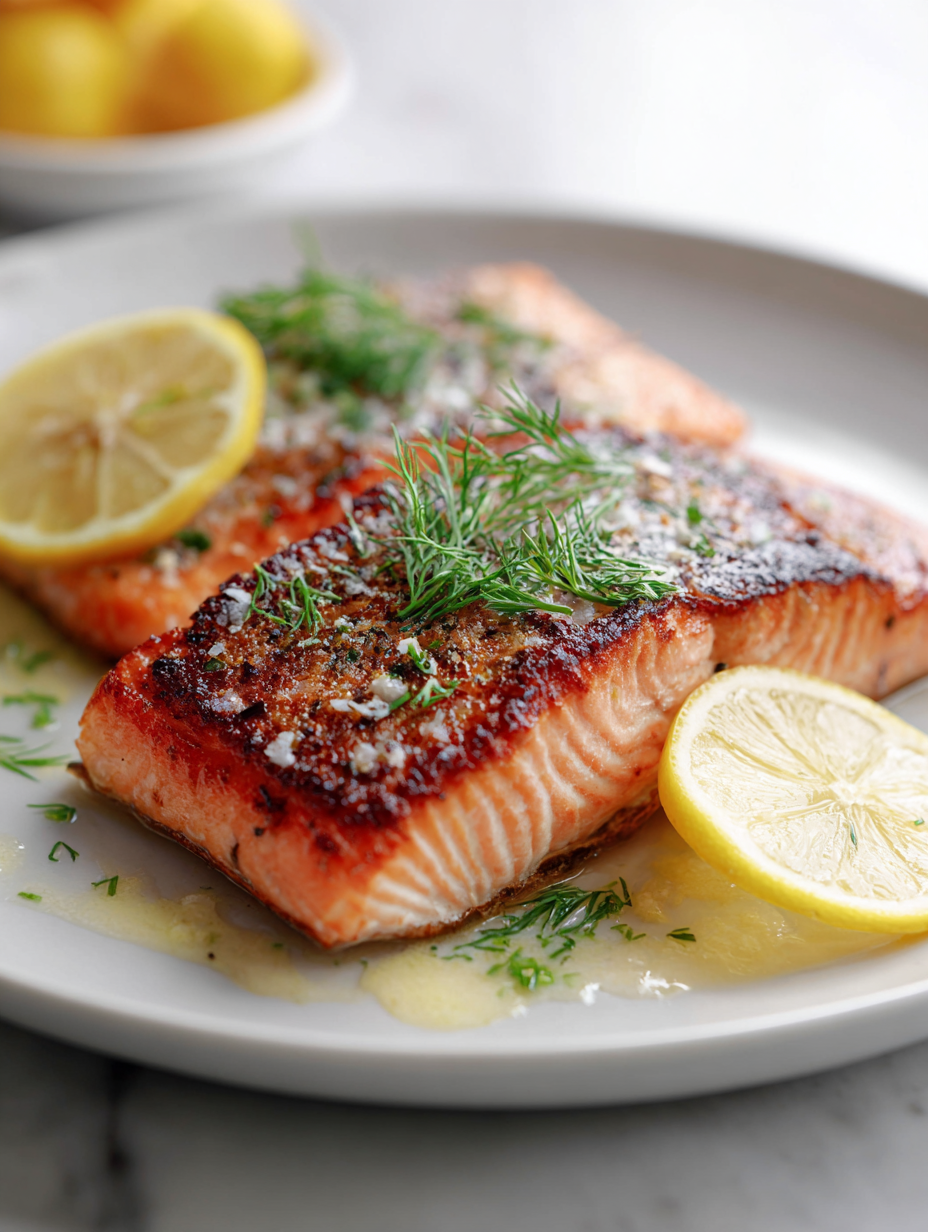
- Finish with a squeeze of lemon or fresh herbs if desired. Serve immediately to enjoy that crackly skin and tender flesh at its best.
Let the salmon rest for 2 minutes on a plate. Finish with lemon juice or herbs. Serve immediately to enjoy the contrast of crisp skin and tender flesh.
How to Know It’s Done
- Skin is deeply golden and easily releases from the pan.
- Flesh is opaque and just flaking at the edges.
- Crackle sound when pressing the skin with a spatula.
Crispy Skin Salmon
Ingredients
Equipment
Method
- Pat the salmon fillets dry thoroughly with paper towels, especially the skin, until no moisture remains. This step is key to achieving maximum crispiness.
- Season the flesh side lightly with salt and black pepper, avoiding the skin to keep it crisp. Let it sit briefly while you prepare your pan.
- Preheat your heavy skillet over medium-high heat for about 2 minutes until it’s hot but not smoking. You’ll see a faint shimmer when it’s ready.
- Add a thin layer of high-smoke-point oil to the hot skillet, tilting it to evenly coat the surface. When the oil shimmers and just starts to smoke gently, it’s ready.
- Gently place the salmon fillets skin-side down into the skillet. Press down lightly with a spatula for about 10 seconds to prevent curling and ensure full contact.
- Cook the fillets without moving them for 4 to 5 minutes, until the skin turns a deep golden brown and releases easily from the pan. You’ll hear a satisfying crackle as it crisps up.
- Carefully flip each fillet over using a fish spatula, then cook the flesh side for an additional 1 to 2 minutes. The fish should be opaque and flaky, with the skin still crispy.
- Remove the salmon from the pan and place on a plate. Let it rest for 2 minutes—this helps the juices settle and keeps the skin crisp.
- Squeeze fresh lemon over the fillets and garnish with additional black pepper if desired. Serve immediately to enjoy the crispy skin and tender flesh at their best.
Notes
Pro tips for perfect crispy skin
- Boldly dry the skin: Use paper towels to remove all moisture for maximum crispness and crackle.
- Maintain steady heat: Preheat your pan over medium-high until it’s just shy of smoking, for even searing.
- Press gently after placing fish: Use a spatula to hold down the fillet for 10 seconds, ensuring the skin stays flat and crisp.
- Flip carefully: Wait until the skin releases easily and is deep golden before turning, to avoid tearing.
- Finish with a rest: Let the salmon sit for 2 minutes after cooking to allow juices to settle and skin to firm up.
- Don’t rush the sear: Resist the urge to move the fish around—patience ensures a crackly exterior and tender inside.
- Use a high-smoke-point oil: Grape seed or clarified butter prevents burning and creates a shimmering surface that crackles.
Common mistakes and how to fix them
- FORGOT to dry the skin thoroughly before searing—use paper towels for best crispness.
- DUMPED the heat too quickly—maintain steady medium-high heat for even crisping.
- OVER-TORCHED the skin—remove pan once deep golden to prevent bitterness.
- SKIPPED resting time—rest fish for 2 minutes for better juiciness and easier serving.
Quick fixes for crispy skin
- When skin sticks, splash a little hot water—helps release it gently.
- If skin is soggy, blot with paper towels and restart with higher heat.
- Dump the pan if too smoky—switch to a quieter, less fragrant oil like refined canola.
- Overcooked fish? Rest it briefly to reabsorb juices and prevent dryness.
- Pan too cold? Patch with a touch of oil and a quick sear to revive crispness.
Prep, store, and reheat tips
- Pat the salmon skin dry thoroughly with paper towels before storing—this helps maintain crispness when cooked later.
- Wrap the fillets tightly in plastic wrap or store in an airtight container; keep in the fridge for up to 24 hours for optimal freshness.
- For longer storage, freeze the salmon up to 2 months; thaw in the fridge overnight, ensuring it’s at room temperature before searing.
- Reheating isn’t recommended for crispy skin—best to enjoy fresh, but if needed, gently rewarm in a hot skillet for a minute to revive some crispness.
- Flavor may diminish slightly after storage, so consider adding a fresh squeeze of lemon or herbs just before serving to brighten the dish.
Top questions about crispy skin salmon
1. Why is my salmon skin not crispy?
Ensure the skin is thoroughly dried with paper towels before searing; moisture is the enemy of crispiness.
2. How do I get the skin to crackle properly?
Use a hot pan with high-smoke-point oil like grapeseed, and don’t move the fish too early.
3. How long should I sear the salmon skin-side down?
Cook the salmon skin-side down for about 4-5 minutes until deeply golden and crispy, then flip carefully.
4. Can I cook multiple fillets at once?
Don’t overcrowd the pan; cook in batches if necessary to keep the heat steady and crisp the skin better.
5. Should I rest the salmon after cooking?
Rest the cooked salmon for 2 minutes; this helps juices settle and keeps the skin crispy at serving time.
6. How do I know when the skin is crispy?
Look for a deep golden color and a crackling sound as signs the skin is crispy enough.
7. What if the skin sticks to the pan?
If the skin sticks to the pan, splash a little hot water or gently loosen with a spatula.
8. How do I flip the salmon without breaking the skin?
Use a fish spatula to flip the salmon carefully, ensuring the skin stays intact and crispy.
9. Should I add lemon before or after searing?
For extra flavor, squeeze fresh lemon over the fish right after cooking for a bright contrast.
10. Can I make crispy skin salmon ahead of time?
Store leftovers in an airtight container in the fridge for up to 24 hours, but the skin won’t stay crispy upon reheating.
There’s something about that crackly skin on salmon—it’s a simple pleasure that still feels a bit special, even after all these years. When it’s just right, the aroma of seared fish mixed with a hint of smoky oil is a familiar, comforting scent in my kitchen. It’s a reminder that great flavor often comes down to patience and a good, honest technique.
In times when I need a quick, satisfying meal, crispy skin salmon always delivers. It’s a dish that keeps me honest, reminding me to pay attention to heat and patience. More than anything, it’s a reminder that some of the best meals are the simplest—done well, they speak for themselves.

Hi, I’m Daniel Whitaker, the voice behind Micromanaging Flavor. For me, micromanaging flavor is not about perfectionism. It is about paying attention. It is about understanding the small adjustments that turn a good dish into a great one. This blog is my space to explore those details and share what I learn along the way.
