A cheese ball might seem like just a throwback party snack, but it’s actually a chameleon in the appetizer world. Toss in herbs, nuts, or even spicy bits, and suddenly it’s a conversation starter at any gathering. I love how simple ingredients can be transformed into something both nostalgic and fresh, depending on the day’s mood.
There’s a charm in shaping and rolling it, feeling the cool, creamy mixture between your fingers. It’s one of those recipes that sparks memories of family get-togethers, yet it’s flexible enough to fit modern tastes or themed celebrations. Sometimes, it’s the little twists that turn a classic into something special.
For me, the cheese ball isn’t just about flavor—it’s about the stories that come with it, the hands-on prep, and the shared bites. It’s a reminder that even the simplest ingredients can come together to create joy and connection. When I make one, I know it’s not just the cheese that’s being shared, but a little piece of tradition and creativity.
Focusing on how a cheese ball can be a nostalgic yet surprisingly versatile appetizer that sparks conversations and brings people together, especially when customized with unexpected ingredients or themed for different occasions.
Cheese Ball as a Nostalgic Canvas
- Making this cheese ball takes me back to my childhood family gatherings, where everyone gathered around the kitchen table.
- I love experimenting with unexpected mix-ins like chopped olives or spicy peppers, which turn a classic into a showstopper.
- There’s a quiet satisfaction in shaping and rolling the cheese mixture, feeling the coolness against my palms.
- Sharing this cheese ball at parties always sparks conversations and nostalgic stories, making it more than just an appetizer.
- Sometimes, I add a drizzle of honey or a sprinkle of smoked paprika on top for that perfect hint of sweetness or smokiness.
The story behind this recipe
This cheese ball recipe was born out of a late-night craving and a cluttered fridge. I was looking for something easy, comforting, and a little bit nostalgic. My grandma used to make something similar, but with a twist of my own—adding a bit of hot sauce or fresh herbs always seemed to bring it to life. It’s funny how a simple mixture of cheese and cream can turn into a centerpiece when shaped just right and served with crunchy crackers or veggie sticks. Every time I make it, I think about the messy counters, the laughter, and the way everyone’s face lights up when they see it coming out of the fridge.
Cheese Ball Trivia & Origins
- The cheese ball gained popularity in mid-20th century America as a festive, communal appetizer for family gatherings and potlucks.
- Originally, cheese balls were often coated in nuts or herbs to hide imperfections and add texture, a practical tip from frugal home cooks.
- The classic cheese ball is believed to have roots in European cheese molds, evolving over time into the more casual, handheld snack we enjoy today.
- Variations with exotic ingredients like dried fruits or spicy seasonings started emerging in the 1970s, reflecting experimentations in home kitchens.
- Despite its humble origins, the cheese ball has become a symbol of holiday and party spreads, often associated with nostalgia and comfort.
Key Ingredients & Tips
- Cream cheese: I love how it turns silky and smooth when softened, making the whole mixture creamy and inviting. Skip the softened step to avoid lumps, and consider using neufchâtel for a lighter touch.
- Cheddar cheese: Sharp, aged cheddar gives a punch of flavor and melts just enough to blend seamlessly. If you prefer milder, swap for mozzarella, but the bite won’t be the same.
- Green onions: The crunch and bright onion flavor add freshness, especially when finely chopped. For a milder note, try chives or scallions, which are more delicate.
- Nuts (pecans or walnuts): Toasted nuts bring crunch and a toasty aroma—don’t skip the toasting; it really amplifies the flavor and aroma. For allergies, try toasted sunflower seeds for a nutty crunch.
- Herbs (parsley or dill): Fresh herbs provide a vibrant contrast to the richness. If out of fresh, use dried but reduce the quantity; dried herbs are more concentrated and can overwhelm.
- Hot sauce or paprika: Adds a subtle kick or smoky depth. Adjust the amount based on your heat preference; start small and add more, tasting as you go.
- Optional add-ins (olives, peppers): These give bursts of briny or spicy flavors. Chop finely so they blend well and don’t overpower the smooth texture.
Spotlight on key ingredients
Cream cheese:
- I love how it turns silky and smooth when softened, making the whole mixture creamy and inviting. Skip the softened step to avoid lumps, and consider using neufchâtel for a lighter touch.
- Cheddar cheese: Sharp, aged cheddar gives a punch of flavor and melts just enough to blend seamlessly. If you prefer milder, swap for mozzarella, but the bite won’t be the same.
- Green onions: The crunch and bright onion flavor add freshness, especially when finely chopped. For a milder note, try chives or scallions, which are more delicate.
Cheddar cheese:
- Cream cheese: I love how it turns silky and smooth when softened, making the whole mixture creamy and inviting. Skip the softened step to avoid lumps, and consider using neufchâtel for a lighter touch.
- Sharp, aged cheddar gives a punch of flavor and melts just enough to blend seamlessly. If you prefer milder, swap for mozzarella, but the bite won’t be the same.
- Green onions: The crunch and bright onion flavor add freshness, especially when finely chopped. For a milder note, try chives or scallions, which are more delicate.
Notes for ingredient swaps
- Dairy-Free: Swap cream cheese for dairy-free cream cheese or mashed avocado. Expect a slightly different texture, more earthy and less tangy.
- Cheddar Variations: Use Monterey Jack or pepper Jack for milder or spicier flavor. Cheeses like Gouda or Havarti add creaminess and depth.
- Herb Alternatives: Fresh basil or thyme can replace parsley or dill. They bring different aromatic qualities—think fragrant or slightly minty.
- Nuts & Seeds: Use toasted sunflower seeds or pumpkin seeds to replace nuts. They add crunch and a toasty note, perfect for allergies.
- Hot Sauce & Spices: Adjust hot sauce or paprika, or omit for milder flavor. Smoked paprika adds a smoky depth, while cayenne adds heat.
- Add-ins: Chopped olives, sun-dried tomatoes, or roasted red peppers give bursts of savory or tangy flavor. Chop finely for even distribution.
- Flavor Boosters: A splash of Worcestershire or soy sauce can deepen umami. Use sparingly to avoid overpowering the cheese flavor.
Equipment & Tools
- Medium mixing bowl: To combine and mix the cheese ingredients.
- Rubber spatula: To thoroughly mix the ingredients smoothly.
- Plate for shaping: To form and chill the cheese ball.
- Small skillet: To toast nuts for added flavor and crunch.
- Plastic wrap: To wrap and chill the cheese ball securely.
Step-by-step guide to cheese ball
- Gather all equipment: a medium mixing bowl, rubber spatula, a sturdy plate for shaping, and a small bowl for nuts. Preheat oven to 180°C (350°F) if toasting nuts.
- Soften 8 oz cream cheese in a microwave-safe bowl for 15-20 seconds until just soft but not melted. This makes mixing easier and smoother.
- Finely chop 1/4 cup green onions and set aside. If using dried herbs, measure about 1 tablespoon of parsley or dill.
- In the bowl, combine softened cream cheese, 1 cup shredded sharp cheddar, chopped green onions, and 1 teaspoon hot sauce. Mix thoroughly with a spatula until uniform and creamy.
- Taste and adjust seasoning if needed—add a pinch of salt or more hot sauce for extra kick. The mixture should be flavorful but balanced.
- If using nuts, toast 1/4 cup pecans or walnuts in a dry skillet over medium heat for 3-4 minutes until fragrant and slightly darker. Let cool.
- Shape the cheese mixture into a ball with your hands, about 3 inches in diameter, pressing gently to form a smooth round shape. Place on a plate.
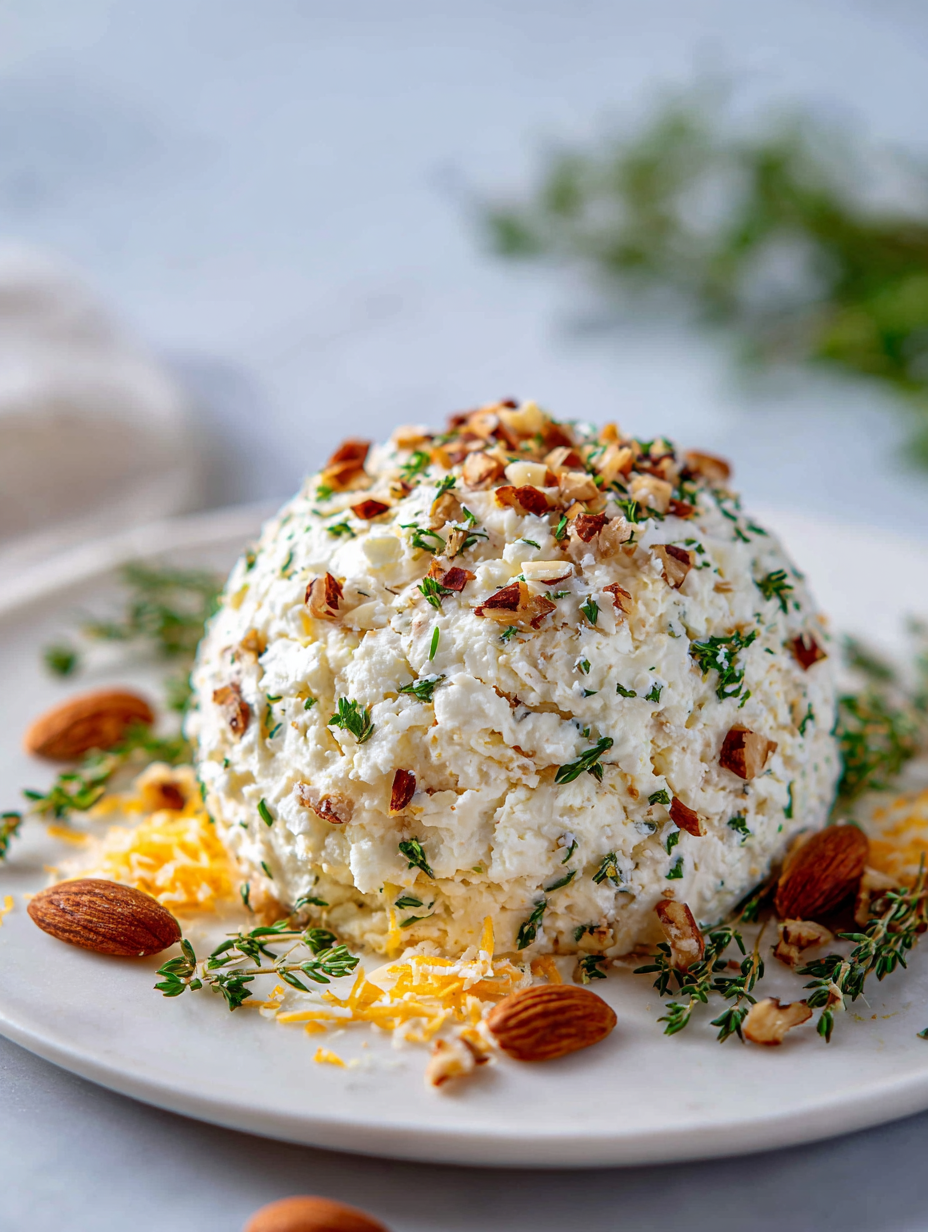
- Roll the cheese ball in toasted nuts, pressing gently to coat evenly. For a more rustic look, press some nuts into the surface instead of rolling.
- Wrap the cheese ball tightly with plastic wrap. Chill in the fridge for at least 1 hour, preferably 2, to let flavors meld and the shape set.
- Just before serving, remove from fridge. Optional: garnish with additional herbs or a drizzle of honey for contrast. Serve with crackers, veggie sticks, or sliced baguette.
Wrap the shaped cheese ball tightly with plastic wrap and chill in the fridge for at least 1 hour. Just before serving, unwrap and transfer to a serving platter. Garnish with herbs or a drizzle of honey if desired. Serve with preferred accompaniments and enjoy the contrast of creamy, crunchy, and savory flavors.
How to Know It’s Done
- Cheese ball is firm but not hard, with a smooth, cohesive shape.
- Nuts are toasted and fragrant, with a light crunch when pressed against the surface.
- The cheese mixture is well mixed, with no lumps and a balanced flavor profile.
Classic Cheese Ball
Ingredients
Equipment
Method
- Place the softened cream cheese in a medium mixing bowl and use a rubber spatula to stir until smooth and creamy, about 1-2 minutes. The mixture should be silky and soft to the touch.
- Add the shredded cheddar cheese to the bowl and fold it into the cream cheese until evenly combined, creating a marbled, textured mixture with a rich aroma.
- Finely chop the green onions and sprinkle them into the mixture, then add the hot sauce. Mix everything thoroughly until the mixture is uniform and slightly fluffy, with the green onions evenly dispersed.
- Sprinkle some salt if desired, then use your hands or a spatula to gently combine all ingredients, ensuring the mixture is cohesive and easy to shape.
- Transfer the mixture onto a plate and shape it into a tight, round ball about 3 inches in diameter using your hands. You may wet your hands slightly to prevent sticking for a smoother shape.
- Toast the nuts in a small skillet over medium heat for about 3-4 minutes until fragrant and golden brown, then let them cool slightly.
- Once cooled, spread the toasted nuts onto a shallow plate. Roll the shaped cheese ball in the nuts, pressing gently to coat evenly and create a crunchy exterior.
- Wrap the coated cheese ball tightly in plastic wrap and refrigerate for at least 1 hour to firm up and allow flavors to meld.
- Remove the cheese ball from the fridge, unwrap, and transfer to a serving platter. Garnish with additional herbs or a drizzle of honey if desired, then serve with crackers or veggie sticks.
Pro Tips for Perfect Cheese Balls
- Use room temperature cheese to ensure a smooth, creamy mixture without lumps.
- Toast nuts separately to enhance their aroma and crunch; add after shaping for best texture.
- Chill the cheese ball for at least an hour; it firms up, making it easier to coat evenly.
- Mix herbs and add-ins gently to prevent breaking down the cheese texture and maintain shape.
- For an extra burst of flavor, rub a little smoked paprika or hot sauce into the surface before chilling.
- When shaping, wet your hands slightly to prevent sticking and achieve a smooth, tight ball.
- Serve with crisp crackers or veggie sticks immediately after removing from fridge to enjoy optimal freshness.
Common Cheese Ball Mistakes & Fixes
- FORGOT to check cheese texture → Ensure mixture is cohesive and not crumbly.
- DUMPED in nuts too early → Toast nuts separately for better flavor and crunch.
- OVER-TORCHED nuts → Toast nuts lightly until fragrant, avoid burning to prevent bitterness.
- MISSED chilling time → Chill at least 1 hour for flavors to meld and shape to set properly.
Quick Fixes & Pantry Swaps
- If cheese is crumbly, splash a little warm milk and mix until smooth.
- When nuts are burnt, patch by toasting fresh ones for crunch and aroma.
- Over-torched nuts? Shield with a quick sprinkle of sugar and start over.
- Forgot chilling? Rescue with an extra 30-minute fridge rest for firmness and flavor melding.
- If mixture is too soft, open the fridge for 10 minutes to firm up before shaping.
Prep, store, and reheat tips
- You can prepare the cheese mixture a day in advance; keep it tightly wrapped in the fridge. Flavors meld better, and it firms up nicely.
- Chill the shaped cheese ball for at least 1 hour before serving to help it hold its shape and develop depth in flavor.
- Store leftovers in an airtight container in the fridge for up to 3 days. The texture might soften slightly, so let it sit at room temperature for a few minutes before serving again.
- Reheat the cheese ball gently in a low oven (about 150°C/300°F) for 10-15 minutes if you prefer it warmer. The aroma will become more inviting, and the cheese softer.
- For longer storage, freeze the uncoated cheese ball wrapped tightly in plastic wrap and then foil for up to 1 month. Thaw in the fridge overnight and recoat with nuts before serving. Expect a slight change in texture.
Top questions about cheese balls
1. Should I serve the cheese ball cold or at room temperature?
A cheese ball is best served chilled, which helps it hold its shape and meld flavors. Let it rest in the fridge for at least an hour before slicing or serving.
2. Can I prepare a cheese ball in advance?
Yes, you can make it ahead. Prepare the mixture the day before, shape it, and keep it refrigerated. Just coat with nuts or herbs before serving for freshness.
3. My cheese mixture is crumbly, how do I fix it?
If the mixture feels too crumbly, add a teaspoon of milk or cream and mix until smooth. For softer texture, chill it longer before shaping.
4. How do I toast nuts properly for coating?
Toast the nuts in a dry skillet over medium heat until fragrant and lightly golden, about 3-4 minutes. This brings out their flavor and crunch.
5. Should cream cheese be softened before mixing?
Use softened cream cheese for a silky, smooth mixture. Cold cheese will be lumpy and harder to mix. Let it sit at room temperature for 15 minutes.
6. Can I add other ingredients to the cheese ball?
Yes, you can customize it with ingredients like chopped olives, spicy peppers, or herbs. Just chop finely so it distributes evenly and doesn’t overwhelm the texture.
7. How do I shape the cheese ball without it sticking?
To prevent sticking when shaping, dampen your hands slightly with water or a little oil. This helps get a smooth, tight shape without tearing the mixture.
8. What if my toasted nuts burn?
If nuts burn while toasting, remove them immediately and start with fresh nuts. Toast at a lower heat or for a shorter time to avoid bitterness.
9. How do I slice the cheese ball cleanly?
Use a sharp, clean knife to slice the cheese ball after it’s chilled. For neat cuts, wipe the knife blade between slices, especially if it’s sticky.
10. Can I reheat the cheese ball?
Reheat in a low oven (about 150°C/300°F) for 10-15 minutes if you prefer it warmer. The aroma will intensify, and the cheese will soften slightly.
Making this cheese ball isn’t just about the flavor—it’s about those little moments of hands-on prep and shared bites that bring people together. It’s a simple, honest dish that sparks nostalgia and conversation, especially when you add your own twist.
Whenever I serve it, I’m reminded how basic ingredients can come together to create something comforting and memorable. It’s a humble dish, but one that carries stories, smiles, and a bit of tradition in every bite.

Hi, I’m Daniel Whitaker, the voice behind Micromanaging Flavor. For me, micromanaging flavor is not about perfectionism. It is about paying attention. It is about understanding the small adjustments that turn a good dish into a great one. This blog is my space to explore those details and share what I learn along the way.
