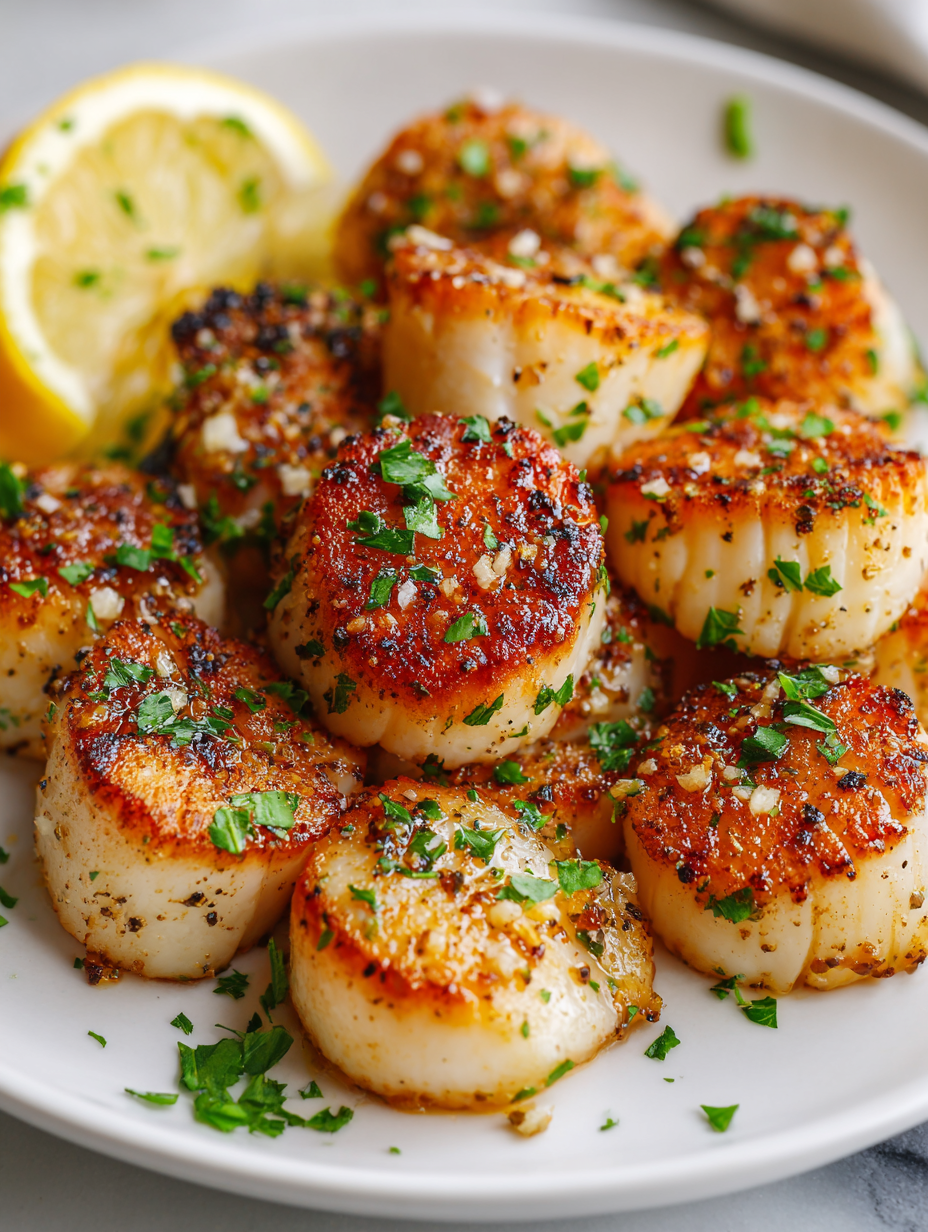
There’s something quietly satisfying about the patience it takes to get scallops just right. It’s not about rushing but about waiting for that perfect caramelized crust to form, revealing their sweet, tender interior. This recipe asks you to slow down, focus on small details, and really listen to what your pan and seafood are telling you.
Searing scallops might seem straightforward, but it’s a dance of timing and temperature. Too hot, and they’ll burn before they caramelize; too cool, and they’ll turn out rubbery. It’s a little ritual—checking the color, smelling the rich aroma, adjusting heat—that turns cooking into a mindful act, a quiet celebration of technique.
And honestly, that moment when you flip them and see that perfect golden edge—that’s when all the fuss pays off. It’s about more than just dinner; it’s a practice in patience and precision, an act of care that transforms simple ingredients into something special. Every time I do it, I’m reminded that good cooking is about respect for the process, not shortcuts.
Focusing on the overlooked patience and precision needed to perfect that elusive, perfectly caramelized sear on scallops—it’s about more than just cooking; it’s a quiet meditation in the kitchen, turning a simple seafood into a moment of mindful craft.
The mindful art of scallops
- There’s something quietly satisfying about the patience it takes to get scallops just right. It’s not about rushing but about waiting for that perfect caramelized crust to form, revealing their sweet, tender interior. This recipe asks you to slow down, focus on small details, and really listen to what your pan and seafood are telling you.
- Searing scallops might seem straightforward, but it’s a dance of timing and temperature. Too hot, and they’ll burn before they caramelize; too cool, and they’ll turn out rubbery. It’s a little ritual—checking the color, smelling the rich aroma, adjusting heat—that turns cooking into a mindful act, a quiet celebration of technique.
- And honestly, that moment when you flip them and see that perfect golden edge—that’s when all the fuss pays off. It’s about more than just dinner; it’s a practice in patience and precision, an act of care that transforms simple ingredients into something special. Every time I do it, I’m reminded that good cooking is about respect for the process, not shortcuts.
The mindful art of scallops
- Cooking scallops this way brings back a memory of the first time I tried to perfect that golden crust. I was frustrated, the heat was too high, and I nearly gave up. But I kept at it, adjusting and watching, until I finally got that perfect sear. Since then, it’s become a quiet ritual I enjoy, especially when I want something elegant but straightforward.
- This recipe isn’t just about technique; it’s about patience and listening—listening to the sizzle, smelling the rich aroma, watching the color change. It’s a small act of mindfulness that turns simple ingredients into something special. Every sear feels like a little victory, a reminder that good things often take time.
- heading: The mindful art of scallops
Trivia and historical notes
- Pan searing scallops became popular in French cuisine, emphasizing quick, high-heat cooking to develop flavor and texture.
- The technique relies on achieving a Maillard reaction, which was historically valued for developing complex, savory flavors in seafood.
- Scallops have been a delicacy since ancient times, with evidence of their consumption dating back to Roman and Greek civilizations.
- In some cultures, seared scallops are served during special celebrations, symbolizing prosperity and good fortune.
Ingredient breakdown: key components
- Sea scallops: I look for firm, dry scallops with a slightly translucent center. You want them fresh and not slimy; a good smell of the sea is key. Skip the pre-soaked or excessively wet ones—they’ll steam instead of sear.
- Salt: I prefer flaky sea salt for seasoning. It dissolves quickly and enhances that sweet, oceanic flavor. Too much salt can overpower, so be gentle and taste as you go. A light sprinkle is all it takes.
- Black pepper: Freshly cracked black pepper adds a subtle bite. I like to add it just before searing to keep that aroma sharp and clean, not burnt or bitter. If you prefer less spice, skip it or use white pepper.
- Oil: I use a high-smoke-point oil like grapeseed or clarified butter. It gets hot enough for a quick sear without smoking excessively. If your oil starts to shimmer and smoke, that’s your cue to add the scallops—timing is everything.
- Butter: A small knob of butter at the end for flavor. It melts into the scallops, adding richness and a slightly nutty aroma. Don’t add it too early or it’ll burn—wait until the last minute for that glossy finish.
- Lemon: Fresh lemon juice brightens the flavor. I squeeze just before serving to cut through the richness. If you don’t love citrus, a splash of white wine can also lift the dish beautifully.
- Herbs (optional): A few sprigs of thyme or parsley for garnish. I prefer fresh herbs for that burst of color and freshness. Chop finely or leave whole during searing for a subtle infusion.
Spotlight on key ingredients
Sea scallops:
- I look for firm, dry scallops with a slightly translucent center. You want them fresh and not slimy; a good smell of the sea is key. Skip the pre-soaked or excessively wet ones—they’ll steam instead of sear.
- ingredient
Oil:
- Salt: I prefer flaky sea salt for seasoning. It dissolves quickly and enhances that sweet, oceanic flavor. Too much salt can overpower, so be gentle and taste as you go. A light sprinkle is all it takes.
- Black pepper: Freshly cracked black pepper adds a subtle bite. I like to add it just before searing to keep that aroma sharp and clean, not burnt or bitter. If you prefer less spice, skip it or use white pepper.
- I use a high-smoke-point oil like grapeseed or clarified butter. It gets hot enough for a quick sear without smoking excessively. If your oil starts to shimmer and smoke, that’s your cue to add the scallops—timing is everything.
Notes for ingredient swaps
- Seafood Alternatives: Use diver scallops or bay scallops. Diver scallops are larger with a richer flavor, while bay scallops are smaller and more delicate—adjust cooking time accordingly.
- Oil Swap: Grape seed or avocado oil can replace vegetable oil. They have higher smoke points and a milder flavor, helping achieve that perfect sear without burning.
- Butter Substitute: Clarified butter or ghee. These won’t burn as quickly and still add that nutty, rich aroma at the end of cooking.
- Salt Options: Flaky sea salt enhances flavor better than regular table salt. If you only have table salt, use a little less to avoid over-salting.
- Citrus Alternatives: Lime juice or a splash of white wine can brighten the dish if lemon isn’t available. They add a similar acidity but different aromatic notes.
- Herb Variations: Fresh thyme or parsley are classic, but chives or tarragon can add a different fresh, bright note. Use sparingly to not overpower the scallops.
- Additional Flavor: A splash of soy sauce or fish sauce in the pan during the last minute can deepen umami. Use sparingly—just a few drops—to avoid overpowering the delicate seafood.
Equipment & Tools
- Heavy skillet: Provides even heat for a consistent sear.
- Tongs: For flipping scallops gently without breaking.
- Spoon: For basting with melted butter for extra flavor.
- Paper towels: To dry scallops thoroughly, preventing steaming.
Step-by-step guide to pan searing
- Equipment & Tools: Use a heavy skillet—preferably cast iron or stainless steel—for even heat. Tongs for flipping, a small spoon for butter, and a paper towel for drying the scallops.
- Pat the scallops dry with paper towels. Remove any small side muscle. Season lightly with sea salt and freshly cracked pepper.
- Heat your skillet over medium-high heat until it shimmers—about 2-3 minutes. Add a splash of high-smoke-point oil, swirling to coat.
- Carefully place scallops in the pan, spaced apart. Do not overcrowd—work in batches if needed. You should hear a loud sizzle.
- Sear for about 1.5-2 minutes until the underside is golden brown. Don’t move them; let the crust form. Flip with tongs or a small spatula.
- After flipping, add a small knob of butter and optional herbs. Spoon melted butter over the scallops continuously for flavor and shine. Cook for another 1-2 minutes.
- Check for doneness: scallops should be opaque and slightly firm but still tender. The edges will be caramelized and slightly crisp.
- Remove from heat. Let rest for a minute. Plate immediately, drizzling with any pan juices or a squeeze of lemon for brightness.
Rest scallops for a minute off-heat. Plate them carefully, spoon pan juices over, and squeeze fresh lemon just before serving for a bright finish.
How to Know It’s Done
- Golden, caramelized crust with a slight jiggle in the center.
- Internal temperature around 50–55°C (122–131°F) for tender, not rubbery.
- Fragrant, rich aroma with a hint of nuttiness from the Maillard reaction.
Perfect Pan-Seared Scallops
Ingredients
Equipment
Method
- Pat the scallops dry thoroughly with paper towels, removing any excess moisture to ensure a good sear. Carefully remove the small side muscle from each scallop if present.
- Sprinkle the scallops lightly with flaky sea salt and freshly cracked black pepper on all sides, seasoning them evenly.
- Heat your heavy skillet over medium-high heat until it shimmers and is hot to the touch, about 2-3 minutes. Carefully add the high-smoke-point oil, swirling to coat the bottom of the pan evenly.
- Gently place the scallops into the hot pan, spacing them apart to prevent overcrowding. You should hear a loud sizzle as they hit the hot surface.
- Sear the scallops without moving them for about 1.5 to 2 minutes, watching for the underside to turn a deep golden brown and develop a caramelized crust. This is the moment to flip them carefully with tongs or a spatula.
- Once flipped, add the small knob of butter and the fresh herbs to the pan. Use a spoon to baste the scallops with the melted butter and herb-infused oil, enhancing their richness and shine. Cook for another 1 to 2 minutes until the scallops are opaque and just firm to the touch.
- Remove the scallops from the pan and transfer them to a warm plate. Squeeze fresh lemon juice over the top for a bright, fresh flavor that balances the richness.
- Let the scallops rest for a minute to allow the juices to settle. Serve immediately, drizzled with any remaining pan juices and a squeeze of lemon for a vibrant finish.
Notes
Pro tips for perfect scallops
- Dry scallops thoroughly: Use paper towels to pat them completely dry for a crisp sear, not a steamed texture.
- Preheat your pan: Wait until it shimmers before adding scallops—this ensures immediate caramelization.
- Don’t overcrowd: Sear in batches if needed; too many scallops at once lowers the pan temperature and ruins the crust.
- Sear without moving: Place scallops in the pan and leave them be for 1.5-2 minutes; moving too early prevents a good crust.
- Baste with butter: Add a small knob of butter after flipping; spoon it over for rich, shiny scallops and extra flavor.
- Watch the color: Aim for a deep golden crust; if it’s darkening too fast, lower the heat slightly to avoid burning.
- Rest briefly: Let scallops sit for a minute after searing; this helps redistribute juices and keeps them tender.
Common mistakes and how to fix them
- FORGOT to dry scallops thoroughly → They steam instead of sear if wet.
- DUMPED oil into hot pan → Use just enough to coat for a crisp crust.
- OVER-TORCHED the scallops → Reduce heat if the crust burns before cooking through.
- MISSED resting time → Let scallops rest 1 minute for juicier, more tender results.
Quick fixes and pantry swaps
- If scallops aren’t searing, splash a few drops of oil and crank the heat.
- When scallops stick, gently loosen with tongs and increase oil temperature.
- Dumped in cold oil? Patch with a quick flick of heat and patience, wait for shimmer.
- Over-torched? Shield with a spoonful of butter and lower heat immediately.
- When in doubt, pantry swap: use vegetable oil if grapeseed isn’t available; it still crisps beautifully.
Prep, store, and reheat tips
- Prep the scallops: thoroughly pat dry and season lightly with salt a few hours in advance. Keep refrigerated to maintain freshness and avoid excess moisture that can prevent proper searing.
- Store leftovers in an airtight container for up to 24 hours. The scallops will lose some of their tender texture but will still be good for a quick reheat.
- Reheat gently: warm in a hot skillet with a touch of butter or oil for just 30 seconds per side until warmed through. Expect a slight loss of crispness, but the flavor remains rich and ocean-bright.
- Avoid freezing scallops if possible; they tend to become rubbery upon thawing. If frozen, thaw slowly in the fridge overnight, then pat dry before cooking to preserve sear quality.
- The flavors of pre-seasoned scallops can intensify slightly after resting, so taste and adjust seasoning if reheating or serving later. The aroma of seared scallops is best enjoyed fresh, but a quick reheat still brings a satisfying, fragrant warmth.
Top questions about pan seared scallops
1. How do I choose the best scallops?
Look for firm, dry scallops with a slightly translucent center. They should smell fresh, like the ocean, not fishy or sour. Avoid pre-soaked ones—they steam rather than sear.
2. Should I dry the scallops before searing?
Pat scallops thoroughly dry with paper towels before cooking. Excess moisture causes steaming instead of searing, resulting in a less crispy crust.
3. What oil is best for searing scallops?
Use a high-smoke-point oil like grapeseed or clarified butter. Heat the pan until it shimmers—about 2-3 minutes—before adding scallops for a perfect sear.
4. How long should I sear scallops on each side?
Sear for about 1.5-2 minutes per side until deep golden brown. Don’t move them during this time. Flip carefully with tongs or a spatula.
5. When should I add butter during searing?
Add a small knob of butter and optional herbs like thyme after flipping. Baste with butter for richness and a glossy finish, cooking another 1-2 minutes.
6. How do I tell when scallops are cooked?
Scallops are done when they are opaque, slightly firm but still tender, with a caramelized crust. They should jiggle just slightly in the center.
7. Should I rest scallops after cooking?
Rest scallops for a minute off the heat. Plate quickly, drizzle with pan juices or squeeze lemon for brightness to serve immediately.
8. Can I cook many scallops at once?
Overcrowding the pan cools the surface, preventing proper searing. Sear in batches if needed, maintaining high heat for that perfect crust.
9. What if my scallops stick to the pan?
If scallops stick or burn, lower the heat slightly and add a bit more oil. For a quick fix, splash a few drops of water to cool the pan and prevent burning.
10. How should I store and reheat leftovers?
Store leftovers in an airtight container for up to 24 hours. Reheat gently in a hot skillet with a touch of butter or oil for about 30 seconds per side.
There’s a quiet satisfaction in mastering this simple technique. The smell of caramelized scallops and the sight of that perfect sear remind me why I keep coming back to the stove. It’s a small act of patience that pays off in rich, tender bites, especially when shared with someone who appreciates the effort.
In the end, this dish is about more than just seafood; it’s a mindful pause in the busy rhythm of life. Every sear is a reminder that good things take time, and sometimes, the simplest ingredients reveal their best when treated with care and attention.

Hi, I’m Daniel Whitaker, the voice behind Micromanaging Flavor. For me, micromanaging flavor is not about perfectionism. It is about paying attention. It is about understanding the small adjustments that turn a good dish into a great one. This blog is my space to explore those details and share what I learn along the way.
